Just like you go to the doctor’s every year for an annual checkup, you need to periodically check up on the health of your backlinks as well.
Every year you should audit your backlinks to identify any spammy ones that may be negatively affecting your SEO–and therefore your traffic, position in the SERPs, and eventually revenue.
Luckily there are a few ways you can get bad backlinks removed or from being associated with you. One such method is using Google's Disavow tool, which prevents your site from being associated with shady websites.
In this guide, we'll cover when to use (and when not to use) Google's Disavow tool, how to use it, and answer FAQs.
What Is Google’s Disavow Tool and When Should You Use It?
Before we go into using the tool, let’s dive into the concept of disavowing links.
Good backlinks can raise your Domain Authority (DA) and Page Authority (PA) scores, increase your visibility in search engines, and help you rank better.
Bad backlinks do just the opposite. They harm your SEO and cause you to lose ranking.
With that said, you shouldn’t go disavowing links left and right.
When you disavow a link, you’re telling the search engines not to factor in a specific link when crawling your site.
There are a few categories of bad backlinks you might consider disavowing:
- Sites set up just for links
- Obviously spam sites
- Links in spam comments
- Backlinks from sites in your non-target country/countries (e.g., a backlink from a German site when your audience is in the U.S.)
If you don’t have control over the spammy links, use the disavow tool so Google disregards them.
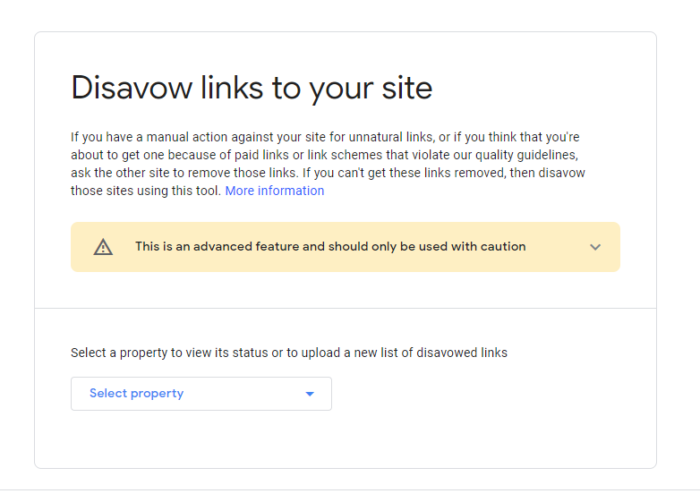
Google’s Disavow Tool Warning
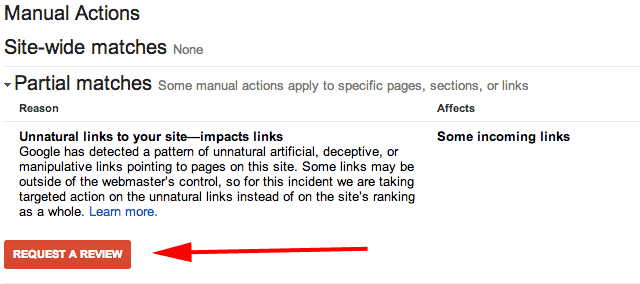
According to Google, using this tool the wrong way can have a negative effect on your rankings.

That sounds pretty intense, but don’t worry; Google just wants to make sure you’re not disavowing the wrong links. You should request removals first, and I’ll talk about that later.
Just make sure you use the tool when you have a lot of low-quality backlinks pointing to your site and when you’re sure they’re causing problems.
The good news is that if you use it the right way, you can improve your rankings.
Disavow Tool Best Practices
There are a few important rules of thumb you should follow when using the disavow tool:
Try Removing Links Via Email First
Google prefers that you try removing links on your own before using the disavow tool.
You can do this with a link removal request.
A link removal request occurs when one site owner emails another to request the removal of a link.
Unfortunately, link-removal requests get a bad rap. Oftentimes they’re ignored, missed, malicious, and even spammy. There’s an art to sending successful link-removal requests.
Use It When You Need It
Matt Cutts (former head of Google’s Webspam team) gives the green light on using the disavow tool:
You may be worried about negative SEO or a bunch of spammy links pointing toward your site. In this case, it would be a good move to disavow. It’s OK to disavow links even if you don’t see a message in your webmaster console.
If your removal-request emails aren’t effective, feel free to use the disavow tool whenever you need.
Use it Like a Shotgun, Not a Rifle
Instead of picking out bad links one by one, you should instead use the domain operator to disavow all bad backlinks from a whole domain instead. This is also a faster method for improving rankings. It may take longer to see results if you handpick bad links one by one.
How to Use the Disavow Tool: A Step-by-Step Guide
Now it’s time to dive deep into how you can use the disavow tool—step by step
Create A List Of Backlinks
There are lots of different tools that you can use to get a list of your backlinks.
These services often try to automate the auditing process. While it does save time, you won’t get as clean of a result as you would if you manually reviewed each link.
To create your own backlink list manually, here’s what you do.
Download Your Links from All Sources
First, go to Google Search Console. Click on “Links” in the sidebar. Download both the latest links and sample links.
If your site has a large number of domains linking to it (over 1,000), you can find more links by downloading the sample link list every day for a few days.
You can also download links from other sources. You can just put in your URL here and you will get a list of all the sites linking to you.
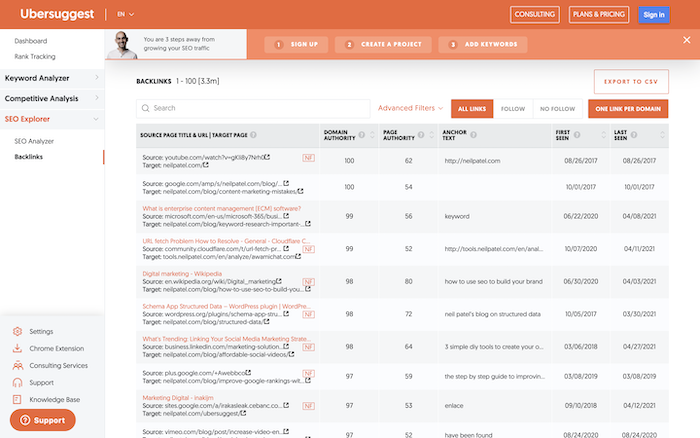
Put Your Links Into One Spreadsheet
Once you have gathered the spreadsheets from your sources, find the URL column of the sites that link to you and copy this column into a new spreadsheet. Feel free to use Google Sheets or Excel—whichever you prefer.
Now you’ll have a master list of every link that leads to your site. You will see some duplicates, but don’t worry because we’ll fix that later.
Break the URLs Into Subdomains
Make a new column that is to the immediate left of your URLs. At the top of the spreadsheet (A1), type this formula:
=left(B1,find(“/“,B1,9-1)
Now, highlight the entire column and hit CTRL+D on your keyboard. This will fill in each cell in the row with the formula.

Once that’s done, highlight the whole column again and convert the results of the formula into values. This will allow you to copy and paste data into the column.
Do this by hitting CTRL+C to copy, then press Edit, Paste Special, and Paste Values Only.
Next, let’s use the Find & Replace tool to break everything down to its subdomain.
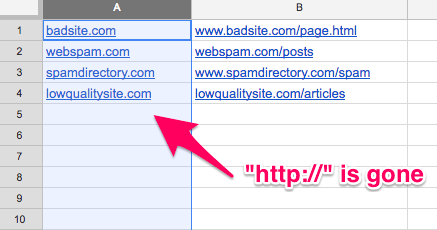
With column A highlighted, click edit, then find and replace. Type “HTTP://” (without quotes), don’t put anything in the replace field, and hit “Replace All.”
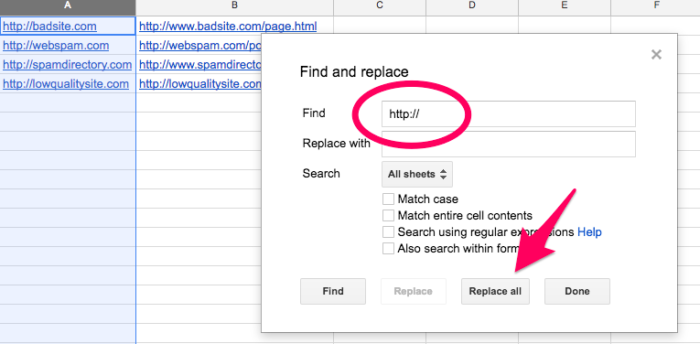
Repeat the same steps with these two phrases
- https://
- www. (Remember the period after www)
After you’re done, column A will now have the subdomains or domains of each URL that points back to your site.
Get Rid of Duplicate Links
You’ll likely have some domains with several links. e want is to only have one link from each domain. Sort column A into alphabetic order and then insert a new column to the left of the domains. Put in this formula:
=if(B1=B2,”duplicate”,”unique”)
Copy this down the entire spreadsheet again (you can also click the little plus sign in the lower right-hand corner of a highlighted cell—also known as the “fill” button).
Next, filter this column to only show the duplicates. Finally, delete each duplicate URL.
Now you’ll have one URL for each domain that’s giving you a backlink.
Audit Your Backlinks
Now, click on each URL on your spreadsheet and decide if you want to keep all the links from each domain or disavow them.

If you’re unsure, you can always mark links as “maybe” and come back to them later after you’ve looked at all your links.
Sometimes, you can pick up patterns after looking at all of your links that you wouldn’t have seen otherwise.
If you’re not sure whether or not you should disavow a link, think through these questions:
“Does this link help me?” i.e., “Could I actually get business and/or traffic from this link?”
“Was this link made 100% for SEO only?”
“If a Google employee saw this link, would I be worried?”
Remember that Google only penalizes sites that are trying to game the system. Every site has its share of unnatural links.
You’re not going to get hit with a penalty if you’re playing by the rules. If you see some unnatural links, don’t sweat it.
Make a Disavow File
Once you’re done reviewing each link, filter the column so you only see the links that you want to disavow.
Next, make a new spreadsheet and copy and paste your domains into the new sheet.
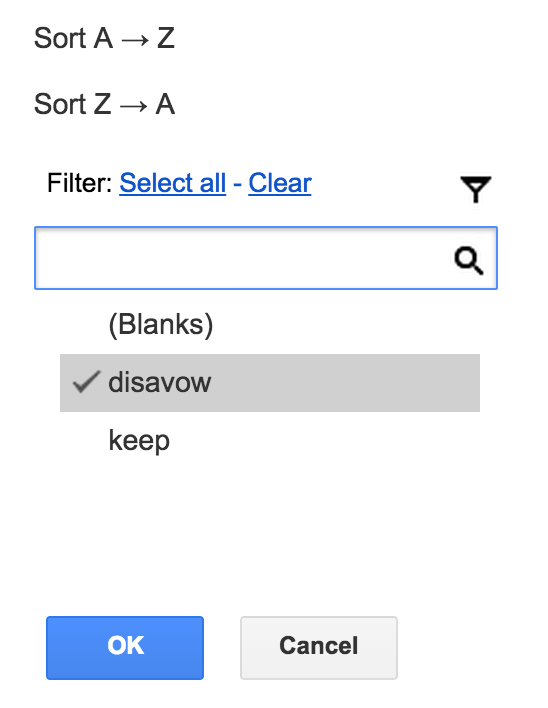
Next, you want to add “domain:” (no quotation marks) in front of every domain name.
When you disavow on the domain level, you’re doing a clean sweep of all the bad links on that domain. When you disavow by URL, you’re more likely to miss bad links.
You’ll want to always disavow at the domain level.
Type the following formula into B1 to add “domain:” to the front of every domain name.
=“domain:”&A1
Use the fill button to paste the formula down the entire column. Once again, highlight the column and then select paste special, paste as values.
Now, column B will be full of disavow directives.

Make a Text File
Your disavow file must be in 7-bit ASCII or UTF-8 format. You can do this a couple of different ways.
On a Mac, open TextEdit, copy and paste column B into TextEdit, and then hit Format and make plain text.
On Google Docs, open a Google Doc, copy column B into a document and then click File, Download As, and Plain text.
Add Comments
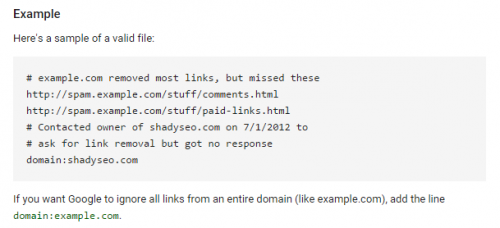
Feel free to add comments to your disavow file by starting your comment with a #. Remember, Google employees don’t look at your disavow file.
The disavow tool is 100% automated. Any comment you add is for your own records. You can insert them to jog your memory on certain things when revisiting the file in the future.
File Your Disavow
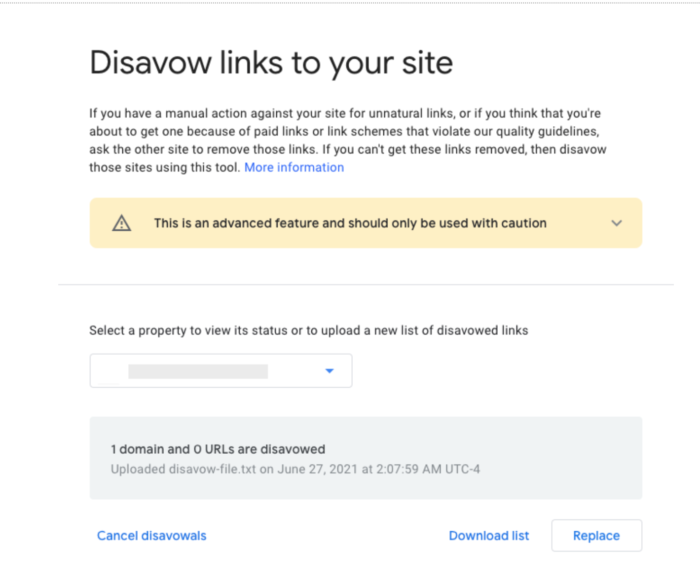
Go to the disavow tool and pick your file from the dropdown list. Click disavow links twice and then select “choose file”. Then you’ll want to upload the .txt file you made.
Here’s what a successful disavow looks like:
Top Disavow Tool Mistakes
You may run into errors when you attempt to disavow links.
Luckily, it’s very common for an error to pop up when disavowing links. In this video, Matt Cutts talks about common mistakes that people run into when using the disavow tool.
- You should only upload a regular text file. No sorting, fonts, or syntax should be added to this file. People try to upload spreadsheets, Word docs, and other file formats. Only upload a text (TXT) file.

- Start out by using the domain: command when disavowing links so that you disavow all links from the entire site. Many times, users will try to disavow specific URLs with a fine-tooth comb. Don’t do this.
- Incorrect syntax is another issue that pops up a lot. Make sure you use a TXT file with the proper syntax.
- If you want to provide commentary on why Google should disavow certain links, save that for the reconsideration request. Don’t write it in the text file.
- When you comment using the disavow tool, make sure that you use tags. If you don’t, it will cause syntax errors. In fact, it’s best to limit your commenting.
- The disavow tool is not a magic wand that will fix every URL. You should clean up your link profile manually in addition to using the tool.
Google’s Disavow Tool FAQs
This all depends on your link profile. For example, if your site has a track record of unnatural links, you may need to do a monthly disavow. In other cases, it’s best to do a link audit first and then a disavow.
By spacing out every disavow, you give yourself time to spot recurring problems and trends. This will help you make better decisions with your link-building strategies.
If you have an average website that doesn’t have a history of low-quality links, and if you aren’t in a super competitive space where negative SEO isn’t much of a factor, you’re good with disavowing only once or twice per year.
Removing a link manually should always be your first option.
If you’re hit with an algorithm penalty, say from Penguin, there’s no need to go on a long, drawn-out process of emailing site owners to ask them to get rid of links.
In that case, you should disavow. If you’ve been hit with a manual penalty, you should definitely try to manually remove links first.
To reavow, modify your disavow file by removing the directive and re-upload it.
Google purposely builds in this lag time to discourage spammers from trying to game the system.
Google applies your disavow directives to your links as soon as it crawls your site.
After you’ve uploaded your directives, Google applies an invisible nofollow tag to the disavowed links that point to your site.
This means that those links will be thrown out of the equation when the Google algorithm considers your website.
You’ll need to wait until Google needs to run the algorithm again, so you won’t see changes right away. Most links only take a month to be removed.
How to Use the Disavow Tool: A Quick Guide
The Disavow tool is a powerful tool to clean up your link profile. Here’s how to use it.
- Download All Links From All Sources
Head to Google Analytics, Ubersuggest, and Ahrefs to view all your links.
- Sort the Data
Pull all the lists together, then remove duplicates and sort.
- Audit Your Backlinks
Check to see which links are problematic, remove the ones that are okay.
- Attempt Manual Removal
Send emails to sites asking them to remove the links.
- Create a Text File
Your disavow file must be in 7-bit ASCII or UTF-8 format. You can do this a couple of different ways.
- Add Comments
Use # to add comments or notes as needed.
- Submit the File to Google
Send your file over and wait for Google’s decision.
How to Use Google's Disavow Tool Conclusion
Whether it’s from hiring a shady SEO agency or being the victim of negative SEO, you’ll need to disavow bad links before you get penalized.
However, be careful and don’t abuse the tool. Disavowing the wrong links can hurt your rankings the same way bad backlinks can.
The disavow tool may not always be the magic button to fix your issues, but when used correctly it should help your traffic and SEO improve.
What results have you experienced from using the disavow tool?
————————————————————————————————————————————–
By: Neil Patel
Title: How to Use Google’s Disavow Tool for Better Rankings
Sourced From: neilpatel.com/blog/google-disavow-tool-seo/
Published Date: Fri, 02 Jul 2021 13:00:00 +0000
